Showing posts with label Windows 8 Trick. Show all posts

How to Install a Font in Windows 7 / Windows 8 / Windows 8.1?

Thursday, 13 March 2014

Windows arrives in with namely TrueType fonts and OpenType fonts. They function with a vast range of computers, printers, and programs.
TrueType fonts (.ttf/.ttc) can be scaled up to almost any size and are crystal clear and readable in all sizes. They can be transmitted to any printer or other output device backed up by Windows.
OpenType fonts (.otf) are almost like TrueType fonts, but generally include a much greater elongation of the fundamental character set, such as miniature capitalization, old-style numeric, and more elaborated shapes, such as glyph and ligatures. OpenType fonts are also crystal clear and readable in almost all sizes and can be transmitted to any printer or other output device backed up by Windows.

Activate your Windows 8.1 without any activator!

Thursday, 27 February 2014


At present Windows 8 or Windows 8.1 is very popular for windows user. So many user’s are using this at the moment. But many people can not activate it. I'll show you how to do activate Windows8.1 in your lifeutterly genuineSo let's start-

How to Enable an Administrator Account in Windows 8

Friday, 20 December 2013

You’ll first need to open an elevated command prompt in Windows 8. This will allow you to open up a command prompt as an administrator, even if you’re not logged in as one. Let’s walk through the process step-by-step.

1. While logged in to either the Windows 8 Start Screen or the traditional desktop, use theWindows Key + X keyboard shortcut to open up the Windows 8 Quick Access Menu.
2. Select Command Prompt (Admin).
Windows 8 Administrator Menu
Figure 1: The Windows 8 Quick Access Menu, activated by using Windows Key + X

3. Depending on your UAC settings for Windows 8, you may get a user access control dialog box like the one shown below in Figure 2. Click Yes if the prompt appears.

Figure 2: Windows 8 User Account Control window

4. Type lusrmgr.msc in the newly-opened command prompt window and press Enter.
The Windows 8 command prompt
Figure 3: The Windows 8 command prompt

5. A window entitled lusrmgr – [Local Users and Groups (Local)] opens. Open the Users folder, and you’ll see a list of all the local users on the current PC. Right-click on the Administrator account and choose Set Password.
6. In the "Set Password for Administrator" Window click Proceed.
The Local Users and Groups (Local) window
Figure 3a: The Local Users and Groups (Local) window

7. Enter the new password and confirm it, then click OK.
Windows 8 Set Password for Administrator
Figure 3b: The Windows 8 Set Password for Administrator window

8. Now right-click on the "Administrator" entry and then select Properties.
Windows 8 Administrator properties
Figure 4: Selecting Administrator properties

9. In the "Administrator Properties" window that opens, make sure that the "Account is disabled" checkbox is unchecked. Then click OK.
Enabling the Windows 8 administrator account
Figure 5: Enabling the Administrator account

The Administrator account should now be activated and ready to use!

Install Windows 8 on a Mac, Macbook: Step by Step BootCamp Guide

Tuesday, 3 December 2013

Steps to Install Windows 8 Developer’s Preview on Mac

The new Windows operating system has a huge amount to offer which surpasses even Apple’s popular iOS interface. The software is a revolution for Microsoft which rejects large amounts of the interface used since Windows ’97. The new system is compatible with laptops, desktops, and importantly tablets.
Running though ARM, it is possible to install the new Windows OS on practically anything from smartphones to Macs. If you are sceptical, you won’t be for long once you have installed this new piece of software from the world’s bestselling OS producer.
Step 1. Get a copy. Quite simply, find a Windows 8 Download (full versions due for release in 2012) and get the software ready for installation.
Step 2. Get a USB Drive with 8GB+ of Memory.
Step 3. Create a Backup of all of your files and folders as a restore point should anything go wrong.
Step 4. Go to ‘Utilities’ and click on ‘Boot Camp Assistant’ to open it.
Install Windows 8 on a Mac
Step 5. Click ‘Continue’ and select all three options: ‘Create a Windows 7 install disk’, ‘Download the latest Windows support software from Apple’, and ‘Install Windows 7’. (If the first option isn’t available then select the others and click ‘Continue’ to advance.)
Step 6. (Skip this step if the ‘Create a Windows 7 install disk’ option was not available in Step 5). Select the Windows 8 ISO file and the USB device on which you want to create a boot disk. When this is done click ‘Continue’.
Step 7. Click ‘Continue’ when told that the drive will be erased.  Type your password when prompted to ‘Add Helper’.
Step 8. The ‘Boot Camp Assistant’ will ask you to ‘create a partition for Windows’. It is recommended that this partition is at least 20GB if you intend to install further software on the Windows partition.
Step 9. Click ‘Install’ and watch as your Mac begins an automatic reboot and begins installing Windows. You will see the message ‘Booting from Boot Camp Assistant created boot drive’. (At this point you will be prompted to ‘insert the Windows 8 install disk’ if you did not have the option to ‘Create a Windows 7 install disk’ in Step 5).
Step 10. Follow the on screen procedure to select partition to install Windows on. Select the ‘BOOTCAMP’ partition to install the software. Make sure the ‘BOOTCAMP’ drive is formatted before selecting by going to ‘Drive Options (Advanced)’ and clicking ‘Format’.
Step 11. Click the ‘Next’ button to finish installing and follow the on screen prompts for Windows setup.
Step 12. Install Mac compatibility software for Windows. If you selected ‘Download the latest Windows support software from Apple’ option in Step 5 then this data will be ready for installation on your boot disk. Double click on the ‘Setup.exe’ icon to install software.
Step 13. You are ready to go. When you turn on your computer, hold either the ‘Alt’ or ‘Option’ key to see an option to boot either your Windows or Mac OS.

How to lock pen drive with password without any software - Windows 7 / 8

Thursday, 28 November 2013

With Windows 7 and 8 you can quickly and easily encrypt and protect data on  Hard drive or USB flash drive.

Encrypt hard drives and data backup


BitLocker is a tool for hard disk encryption, and by default it contains on Windows Vista / 7 Enterprise and ultimate . As well as in the new Windows8 Pro. How quickly and easily encrypt a drive ?  Follow these simple steps.


1. Open the program from start-> Panel-> BitLocker - Drive encryption

2. Select the drive that you want to encrypt.

3. When program starts, USB stick must be plugged in.


4. In the next step, specify how you want to unlock the drive.


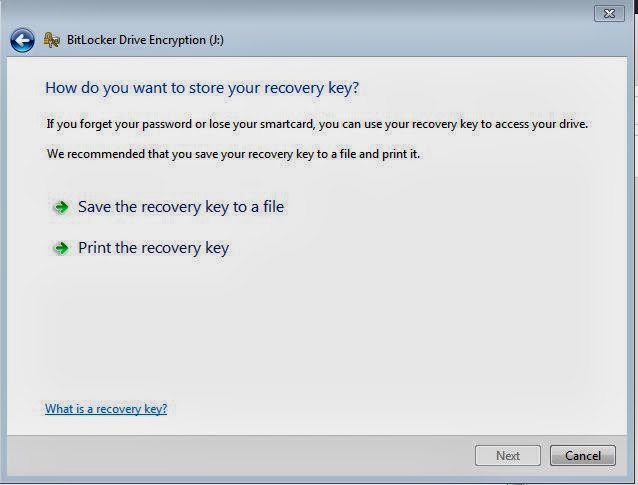
5. Define the recovery key. This can be a file or a printout on paper. No matter how you decide, that document should be stored safely.


6. After all entries are made, you must start the encryption.

7.The encryption starts now. The encryption can take several mins depending on the size of the disk.


8. if the encryption was successful you ll receive a message.

9. An encrypted disk is indicated by the lock before the picture.

10. Put the USB flash drive to a computer, enter the above given password, to gain access to your data.
IP
 

Search This Blog

Popular Posts

PC Tricks

Live Traffic Feed